

ToC:
System Concept
Headunit
Front Stage
Subwoofer
Rear Fill
Amplifier
System Concept:
I have a 2-hour daily commute. I primarily listen to talk radio in the AM and either alternative/rock/country on my afternoon commute, or to a USB drive with basically the same types of music. I do want BT integration, and I don’t (currently) have an iPod other then my shuffle for the gym.
I wanted a good, basic system that does not cut into the usable space in the car. I also cart around my 2 young kids, so loud is not as important as clean and clear sound. I also don’t want to have to hack up any of the stock parts nor to add tweeters in non-stock locations. They SQ may not be the best with this approach, but I want it to all look 100% stock.
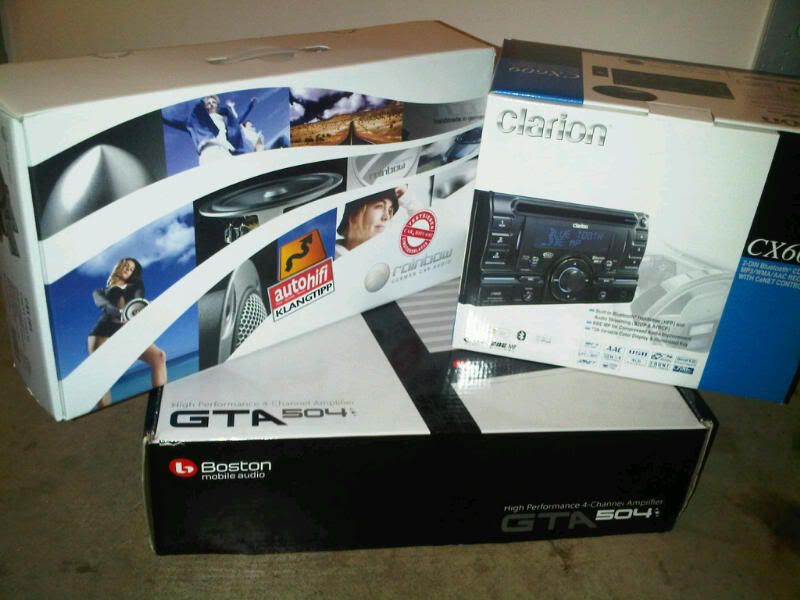
Headunit: Clarion CX609. I went with this due to its basic layout, color-match to the dash, and the core features that it has. It has a few drawbacks (512 file limit in USB being the main one), but otherwise, it seems like a good, basic HU for my needs. I got it on sale at Crutchfield for a great price. Subwoofer crossover and level control built-in and enough power to run the rear speakers. I considered more flashy headunits, as well as some DVD units, but the basic layout of the Clarion really had me impressed. Reviews on it were good, and the radio and BT clarity seem to be major strengths.
I also bought a Metra Axxess SWC. Bought this (and the extra BT wires) from DavidC (SVXdc on most Subaru-related forums) and wired it up.
I also purchased and installed a JDM bezel panel to clean up the look of the install.
Amplifier: Boston Acoustics GTA-504. 50W x 4 at 4 ohms, bridgable to 160×1 for the subwoofer. Should fit under the front seat and will be enough to run a small sub and a set of components in the front doors. I also bought this from Crutchfield due to a 1/2 price sale and $35 in gift cards.
Front stage: Rainbow CSX 265 components. I bought these at the recommendation of a fellow moderator on another site who sells a lot of high-end gear. I was originally going to go with SLC165 coaxials, but he talked me into components. I considered the SLX 265 Deluxe components and the SLC 265 components, but the SLC tweeters would not fit in the stock locations. He recommended stepping up from the SLX to the CSX due to the woofer construction.
Rear speakers: I went with Polk dB651 coaxials for rear fill.
Subwoofer: In the end I went with the Earthquake SWS 10x shallow mount subwoofer. This was one of the few 10″ subs that would fit in the enclosure that I selected. Reviews on it have been consistently good, it has been tested in the enclosure that I purchased.
I considered several other subs, even buying a Pioneer TS-SW841D shallow sub and attempting to build an underseat box for it. In addition to the Pioneer and the Earthquake, I considered Tang Band 10″ and 8″ shallow mount subs from partsexpress (these were still in consideration when I found a good deal on the Pioneer), elemental designs SQ10 (out of stock for months) and e3.8 (too deep), Kenwood Excelon shallow subs (needed too large of a box), and the 10″ Pioneer shallow mount sub.
Enclosure: After a significant amount of searching, evaluating, and researching, I purchased a used fiberglass spare tire enclosure made by JSEnclosures. I had contacted JSE about making an enclosure, but when this one came up for sale, complete with a spare hatch cover and subwoofer, I jumped on it.
I also considered the underseat option (could not get the space that I needed for ANY sub) and the Audio Integrations enclosure. The AI enclosure was a great option, but I could not stomach losing that area of the hatch, plus exposing the sub and enclosure to stuff in the hatch and prying eyes.
In the end, the in-spare option worked out the best for me considering cost, weight, and space.
Back when I did the initial writeup, I took a lot of flack for my choice of HU. For others who might wonder what the “upgrade” was, here were my selection criteria:
- Double DIN
- Rear USB input
- Bluetooth (built-in, no adapter needed)
- Color-match to dash
- Not too flashy
- Dedicated sub pre-out
Because the HUGE issue/weakness in the stock HU for many ’11 WRX owners is the really, really crappy radio sound quality, the Clarion was be a step up for me just based on that improvement. Removing the Subaru “tune” that was native to the stock HU’s radio function was be a big plus for me. Hell, all I intended to do when I started upgrading was to correct the radio issue with a new HU and to add a small powered subwoofer, and it evolved into new speakers, a component sub, and an amp.
Also, I don’t really use the CD function- just the tuner and the USB input. The D/A conversion rates and other CD-based functionality were low on the priority list.
I will openly admit that that pretty much knocks me out of contention for being labelled an “audiophile,” but I am what I am.
Additionally, the other glaring weakness of this HU is the lack of a 4V pre-out. It is one function that I really wish that I had, but I could not find a HU that met my other functionality requirements and had 4V pre-outs- at least not in my price range.
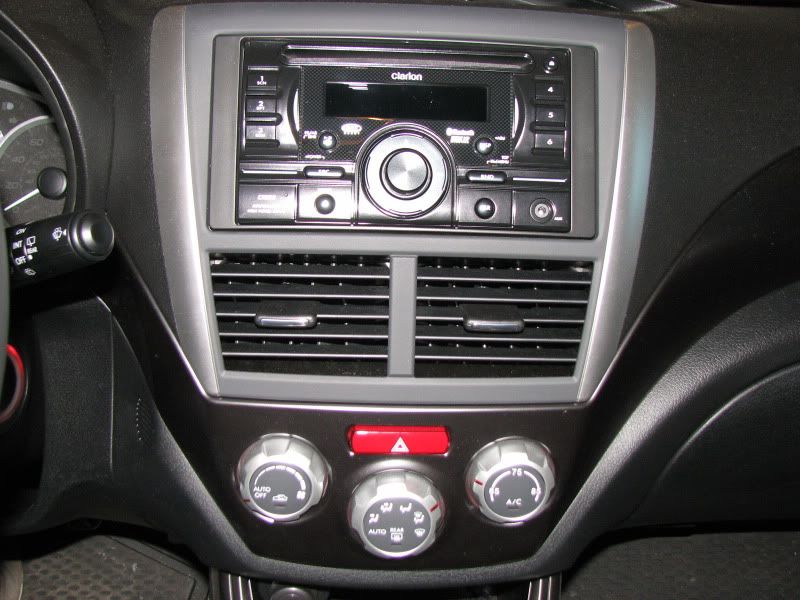
So I got around to installing the Clarion CX609 and the ASWC today. Install was laughably easy, with the hardest part being finding the time to do it. Including the ASWC install, it took about 60 minutes to wire up the harness, wire up the ASWC, remove the stock parts, install the Clarion, activate the ASWC, program the basic stereo controls, and button things back up. I snaked the USB cord to the cubby under the HVAC controls. It tucks out of the way but is easily accessable. I might move it later, but for now it is where I want it.
That time estimate does not include the BT mic or any RCA cables (the cables are not here), but the basic stero is up and running.
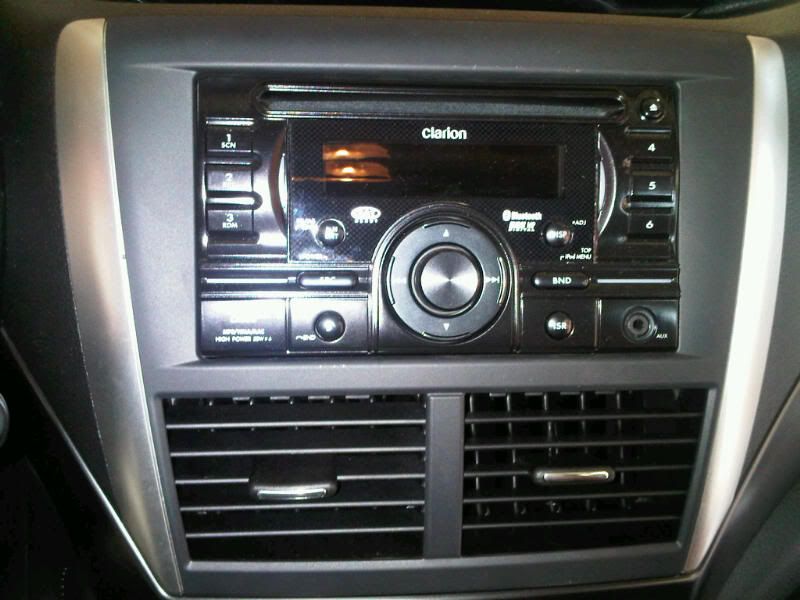
So some pics are below. The first shows how well it blends with the stock dash, and the second shows the lighting. I still need to dial in more orange, but the red looks good enough for now.

So here was a really GOOD surprise: The ASWC works 99% like it did with the stock stereo. The even better part: The 1% difference os for the better!
That is right- the ASWC controls the stereo presets in the same manner as it did with the stock stereo, and unlike what was reported with some other brands, the ^V arrows control file skip when in USB mode- not folder jump, which is what it does with some other brands of stereos. I went back and checked a CD and the same thing applies- full OEM SWC functionality! I have not checked it on iPod (my iPod is a Shuffle), but on the CD, Tuner, and USB, it does exactly what I wanted it to do,which is to follow OEM function.
And the bonus: While the stock stereo cannot be turned on from the SWCs, wih the ASWC, the Clarion CX609 can be turned on or off from the SWCs using the “Mode” button!
As for the sound, even with absolutely no fiddling with the tone controls, the radio sound is so much better then the OEM sound that it is not even fair to compare the 2. Radio reception seems to be the same, and USB sound is just about equal. It is actually better than it was with the stock stereo, but part of that is because the tone settings on the stocker were set up to make the tuner suck less, which made the CD/USB function sound too bass-y AND too bright. WIth the flat EQ of the CX609, I don’t have that over-compensated sound curve to deal with- different functions sound the same.
So for people wanting a few install pics, I will put up a few of the ones that might be helpful.
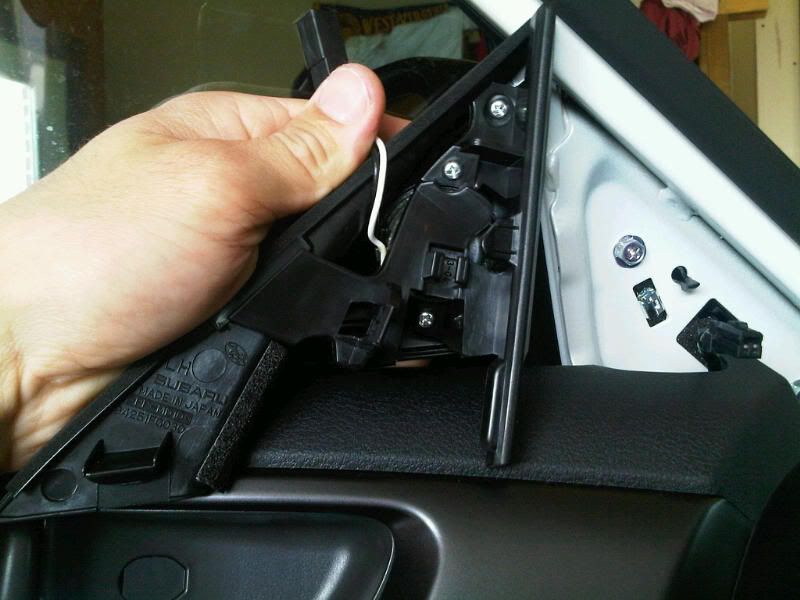
Where I used the plastic pry tool to remove the radio surround:
Location of the pop tabs (I often wonder why install threads never show this):
Where I attached the mounting bracket:
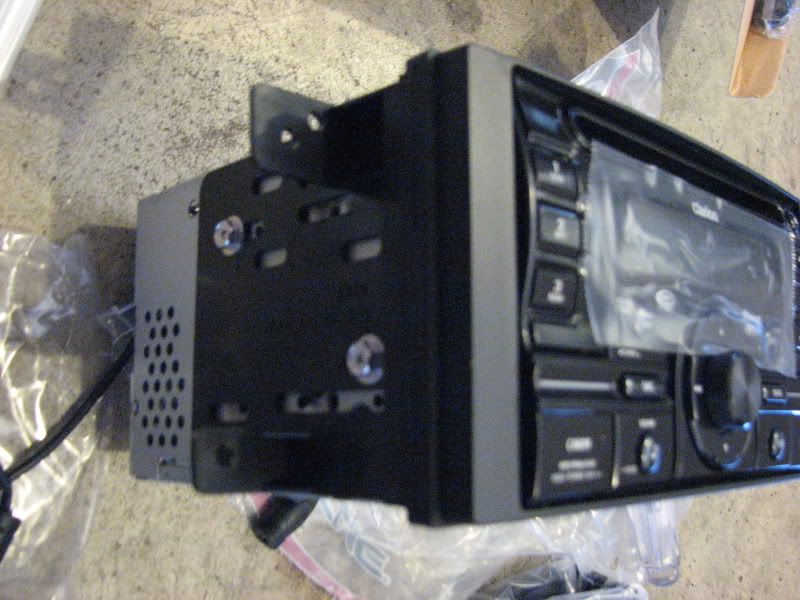
Installed (note screw locations- in case you can’t find them on your own):

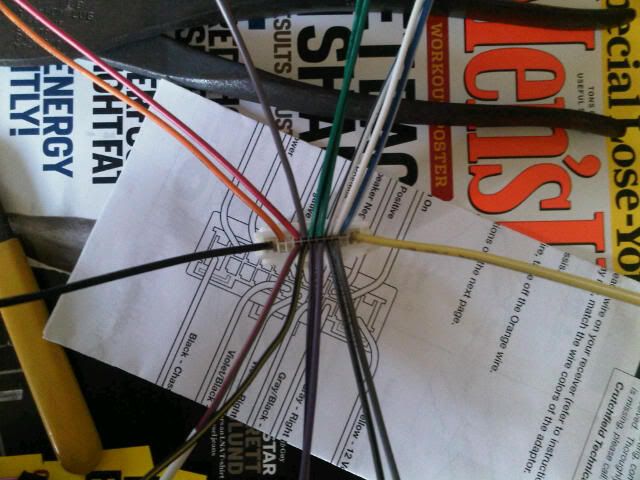
Here is an older pic of the wire harness all seperated out for connection to the adapter harness and ASWC:
07.14.11
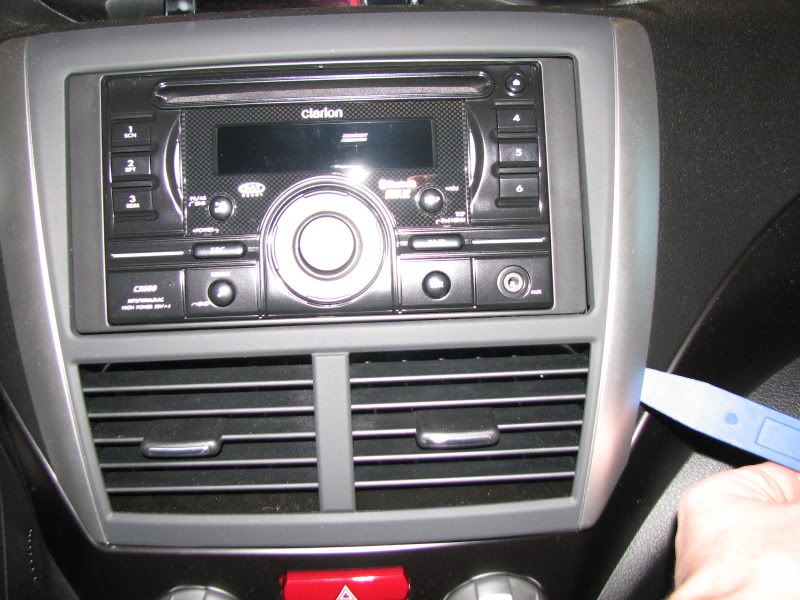
JDM bezel arrived:

07.20.11
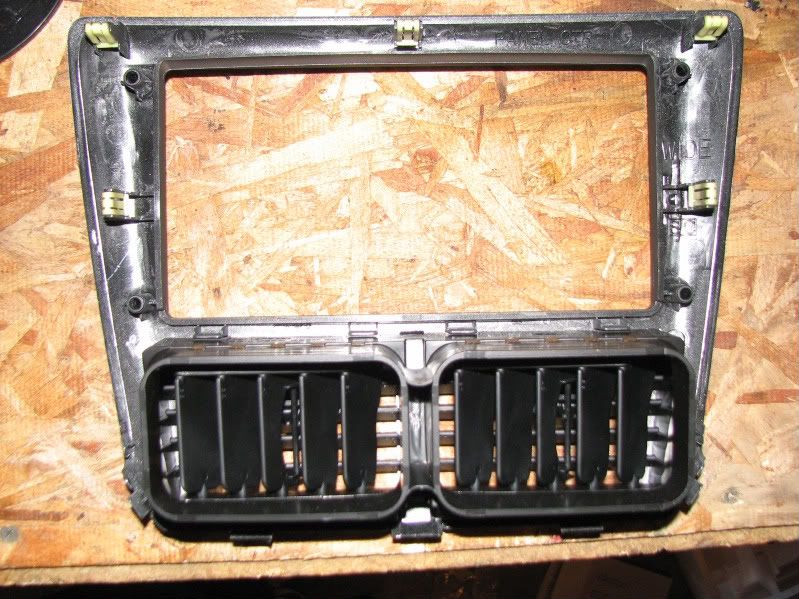
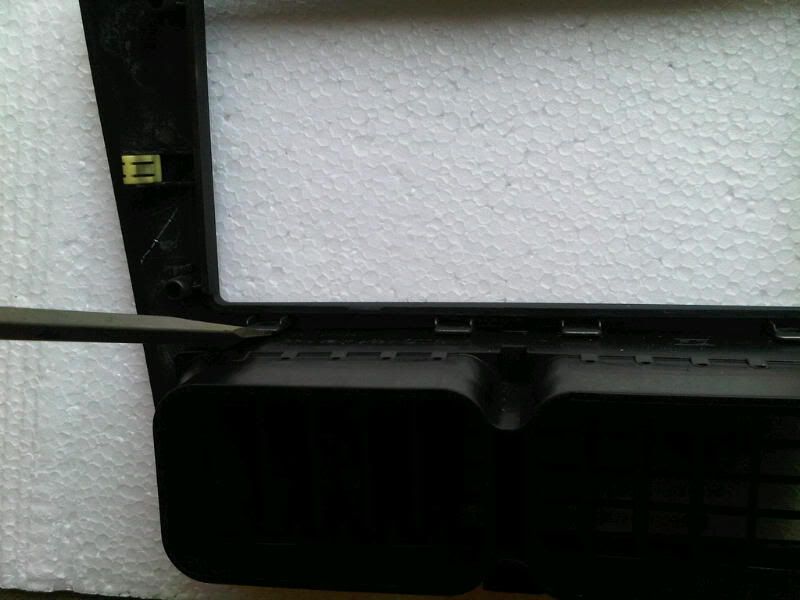
JDM bezel installed! The bottom pic shows how/where to detach the vents from the OEM USDM bezel for attachment in the corresponding location on the JDM bezel.
I really like the look. I reused the OEM metal brackets, which went right onto the Clarion aftermarket HU. Just be sure to use the correct set of holes. The first time that I did it, I accidentally used the wrong set on the passenger side, so the HU was neither flush nor square.
After pulling it out and using the correct holes (about 3mm to the rear of the first set that I tried) all was well.
For a full thread on how to install speakers in the doors of the GR, see this link:
http://www.subaruaudio.net/installations/08-12-impreza/
06.20.11
I FINALLY got my components installed. This was way to long in the works, but I finally got some time to get the Rainbows installed.
This post focuses on installing my Rainbow CSX 265 component set, running off of the HU and with the crossovers in the doors. I did this for simplicity, though when (if) I amplify them, the crossovers will be relocated…probably.
http://www.rainbowcaraudio.com/csx265.html
^^^^^^^^^^^^^^
Speaker info and specs.
So here is how it went down…
First off, I forgot to take a picture of the back side of the door panel to show the location of the door pins. This is REALLY helpful for people doing door speakers, because if you know where they pop spots are, you can pull in the right places.
There is no secret to successfully removing the door panels without feeling like the car is about to break. You can use the special plastic or metal door panel tools, and they sometimes help. The real trick is practice. You WILL feel like the door panel is about to break, especially your first time removing the panel (and/or the first time opening up any door). If you are to nervous, go to a pick-and-pull that has a car of the same make and the same or a similar model and practice there. Don’t kill the car for the sake of it, but get familiar with how they come apart.
What I did get a picture of was the underside of the armrest assembly. Knowing where the retaining clips are located will make it easier to know where to apply pressure.

After getting the armrest off and popping the panel, you have a couple of choices. I try not to remove the lock mechanism and handle assembly unless absolutely necessary. When I am doing a full deadening, I usually pull it all off, but for the speaker install and basic deadener install, it was not needed. I just used a soft cloth to rest the panel on and worked around the panel.
Tweeters:
The first thing that I did was to remove the stock sail panel. To show where the stock clips are located, I took a side-by-side pic of the sail panel and of the location where it clips into place. Note in the picture below that I had not removed the metal clip that goes in the center hole. It is the silver/metal part in the middle of the door. You have to remove this from the door and put it on the post on the sail panel to reattach the sail panel. Don’t forget to do this, if that separates from the sail panel.
On to actually mounting the aftermarket tweeter into the stock tweeter housing. While this was my greatest fear about the install (and the greatest unknown until I got the door apart, it ended up being the best part of the install! The Rainbow CSX 265 set comes with the CAL 20 Silk 20mm silk (duh) dome tweeter.
So the big question for a lot of people wanting to use aftermarket components is whether the tweeters will fit in the stock housing. While a little caulk or hot glue will help position a smaller tweeter, and while a Dremel and/or file can enlarge the stock location, many people just don’t want to permanently hack into the stock parts. Just an FYI on that- the stock parts for the sail panel assembly are fairly cheap, and even getting a set of sail panel blanks and surface (or even flush, depending on the tweeter depth) mounting tweeters there would work for many people.
The stock tweeter is somewhere in the 1″ range, which leaves a lot of options. If you look at how the stock assembly is in 2 parts (plus the actual driver), it becomes apparent that a little caulk and some space filler (foam tape, plastic, etc.) would allow most tweeters under 1″ to work in the stock location.
Knowing this, I figured that the 20mm CAL 20 would be fine in the stock location, even though I might have to do some space filling to make it work without any excessive movement.
Below is a picture of the stock housing, the stock tweeter, and the CAL 20 aftermarket tweeter.

I test-fit the CAL 20 in the stock location and the tweeter was a perfect fit. Not a close fit- a PERFECT fit. When the tweeter was placed in the ring where the stock driver rests, there was no movement from side to side. This was awesome.
My next step was to reassemble the stock assembly to see how the depth worked out. I had a small gap between the back of the tweeter and the rear part of the housing assembly. I knew that I woudl need to fill this with something to hold the tweeter in place. Step 1 was to lay a really thin bead of caulk around the mounting ring of the housing, then to press the CAL 20 into place in the housing. This would reduce the likelihood that that the tweeter would have any movement, particularly once I added something to the back of the tweeter to hold it in place from the back. The caulk that I used was clear (it looks white in the picture but dries clear).

I then pressed the tweeter in place, being careful to position the tweeter wires in the direction where I wanted them to go.

The next step was to cut a small (5/8″ x 5/8″) square of foam adhesive weatherstripping. This is about 3/8″ to 1/2″ thick, but compresses well. Once I affixed it to the back of the tweeter, I replaced the back of the stock tweeter housing and reinstalled the 3 mounting screws. Once this was done, the tweeter was locked into place. From the front, it is completely invisible.

Midranges:
The midranges were very easy to install. The CSX midrange requires a 143mm (5.63″) cutout diameter, so I made a set of PVC spacers/adapters (PM me if you need a set made) then marked and pre-drilled the mounting holes to attach the midrange to the spacer.
If you need spacers, see this page:
http://www.carstereoadapters.com/subaru-speaker-spacers/
I used (3) 1.5″ #10 sheet metal screws to attach the spacer to the door skin. You want to use a #10 sheet metal screw, but for length you can use 1-1.5″ without any complications. I usually use 1.25″ screws with my 3/4″ spacers, but I only had 1.5″ #10s handy.
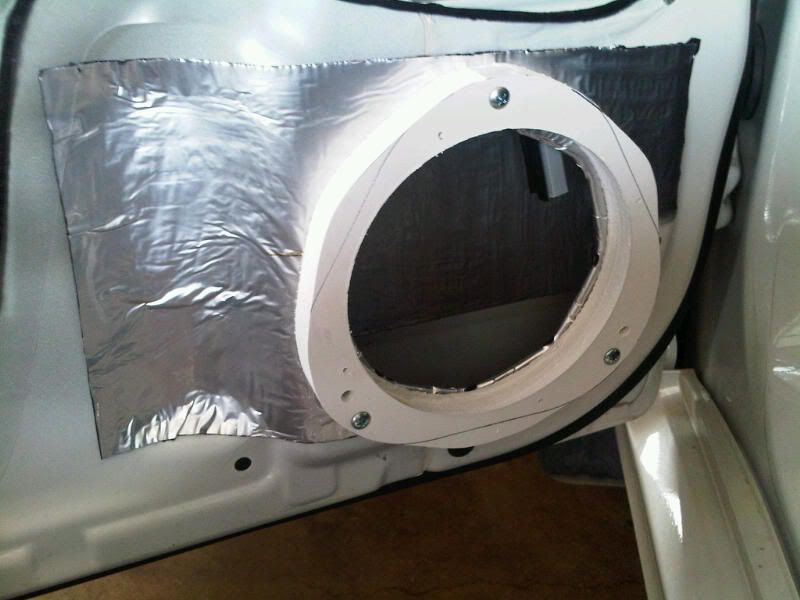
Finally, you want to attach the speaker to the spacer. I used 1/2″ sheet metal screws, but you will usually get mounting screws with your speakers. Whatever you do, PREDRILL YOUR MOUNTING HOLES! This will prevent stripping or cracking. Predrill the holes based on the shank/body size of the screw (not the thread size).
Next, you want to pull your wires to your crossovers and slide the midrange into place.
You can’t see it too well, but I used a layer of deadener as a front gasket. I cut a 1/2″ wide strip and made relief cuts, then curved it to match the curve of the spacer, then I sandwiched it between the speaker and the spacer. After that, I tightened it down.

That was it for the midranges. With the right adapter/spacer and the right wiring, mounting them up and running the wires is as simple as installing coaxials.
Wiring & Crossovers:
If you are not running an amplifier, and thus are re-using the stock wiring, the easiest and most solid way to do the wiring is to use a wiring adapter. The harness that I used is the Metra 72-8104. According to crutchfield, the 2011 requires 2 pairs of the 72-8104 adapters (1 pair front, 1 pair rear). I only did the front speakers for now.
I connected the Metra harness to the stock wiring, cut the spade connector ends off of the adapter, and ran the positive and negatives wires into the inputs on the Rainbow crossovers. From that point, I connected the tweeter wires from above and the midrange wires that I had pulled up from below. I know that the tweeter wires look ugly in their zip-tied condition, but the tweeter wires are soldered to the tweeters, so until I have everything finalized, I did not want to cut off the excess wire.
Mounting the crossovers was pretty straightforward. I mounted them horizontally up under the lock/handle assembly, right in the area where the door panel bulges outward to contour to meet the dash. I first tried to mount it vertically and a little bit forward, but the location interfered with the panel. I tried to move it backward but there were structural impediments. After some playing around, I ended up turning it 90* and mounting it in the location below. I attached it with (2) 1/2″ sheet metal screws.
From there, I ran my wiring to and from the crossover, tightened it down, and wired it up.

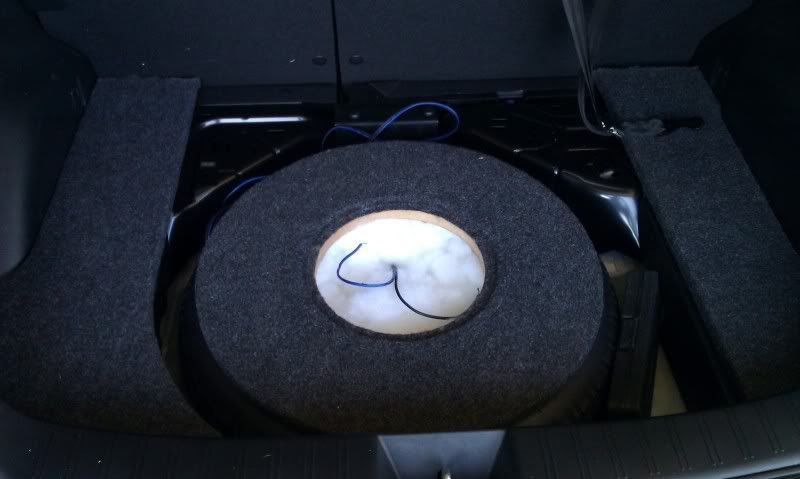
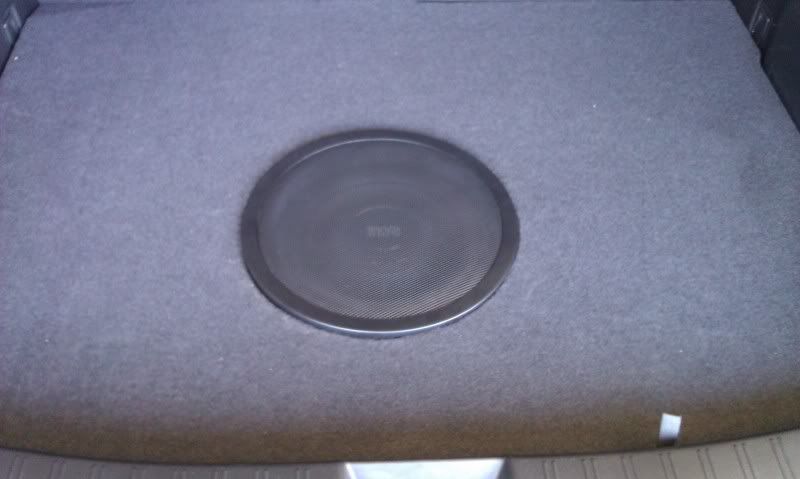
New sub arrived!
This was just a test-fit, but I snapped a few pics. Now I have a really good reason to hurry up and get the amp installed.
Deadening:
When deadening the doors during the front stage install, I did the minimum deadening. I hope to do more later, but I wanted to be sure to get the car back together in an afternoon and to test the speakers, so the more intense deadening job had to wait.
For the basic install, I cleaned the speaker mounting area well with a degreaser, then took a small amount of deadener and applied it to the mounting area. This functions as both deadener and as a gasket for sealing the spacer to the inner door skin.
First, I cut a pie-cutout in the deadener and folded the excess around the back of the inner door skin. Then, I applied a single layer of deadener to the outer door skin immediately behind the speaker location. This may not do much, but it does not hurt.

Wiring & Misc:
If you are not running an amplifier, and thus are re-using the stock wiring, the easiest and most solid way to do the wiring is to use a wiring adapter. I bought mine on Amazon for $7 shipped, but you can get them at Best Buy, Crutchfield, etc. The harness that I used is the Metra 72-8104. According to crutchfield, the 2011 requires 2 pairs of the 72-8104 adapters (1 pair front, 1 pair rear). I only did the front speakers for now.
I also have a picture comparison of the Metra harness to the stock speaker input, but they are the same. That is what makes them useful adapters.
Against my better judgement,I decided to pick up a pair of Polk dB651 coaxials. Crutchfield had them on special price ($60/pr, shipped, with the wiring harness) and Polks were buy-1-get-1-half-off, so my brother and I split 2 pairs.
I figured that they’d be a modest upgrade at best, but I was wrong.
Review of the Polks:
As for the Polks, I installed 2 pairs that day. One pair was in the front of my brother’s Forester. We also added an Alpine HU in place of his stocker. Just upgrading the speakers was a huge upgrade over stock (not that that says much), and with the better HU, it was like night and day.
In my WRX, I installed them in place of OEM coaxials that are WAY nicer than most stock speakers, particularly the base models from previous years. As my stockers had a true coaxial tweeter and a woven cone with a rubber surround, I figured that the Polks would be really similar to what I had. In appearance, that is fairly true.
So why upgrade at all? I only upgraded mine for 2 reasons: to test my spacers in the rear of the GR and because I got the Polks in a limited time Crutchfield sale-price-plus-buy-1-get-1-half-off deal in conjunction with the pair that we put in the Fozzy. In the end, I paid $45 for the Polks, shipped, and including the wiring adapters. The mounting adapters I made.
Anyway, I was not expecting much of an upgrade over stock. They were run off of a Clarion CX609 headunit (nothing much to shout about) and had Rainbow components up front.
I was shocked to hear how much better the Polks sounded versus the stocks. I put in one of them, faded to rear only, and then sat in the back and shifted the balance so that the volume was as close as possible from side to side. The stocker was slightly more efficient (so the setting on fader had to be shifted slightly- 1 or 2 notches- to favor the side with the Polks), but with that volume correction made, both midbass and treble was clearer in the Polk at the same volume level. With the overall system volume increasing, the OEM lost clarity quickly, as compared to the Polk.
With both Polks in, I set the fader so that I could not really hear them from the front, but they provide my back seat passengers (my 2 kids) with a little sound while most of the sound is up front with me.
Again, buying rear fill in my case was an afterthought. Had I not needed to test-fit my spacers (and was I not looking for an excuse to upgrade) I’d have left the stock rears in place.
For now, just some pics of the install…
Speakers and adapter:

Spacers:
![]()
Partial door disassembly:

Underside of handle assembly (note clip location):

Interesting…

Weatherstripping gasket applied:

Installed:

For the amplifier, I went with the GTA-504. At 50w x 4 it won’t be thundering down the block, but it does what it needs to do. For more on how I installed it, see the “Wiring” page under the How-to” section.
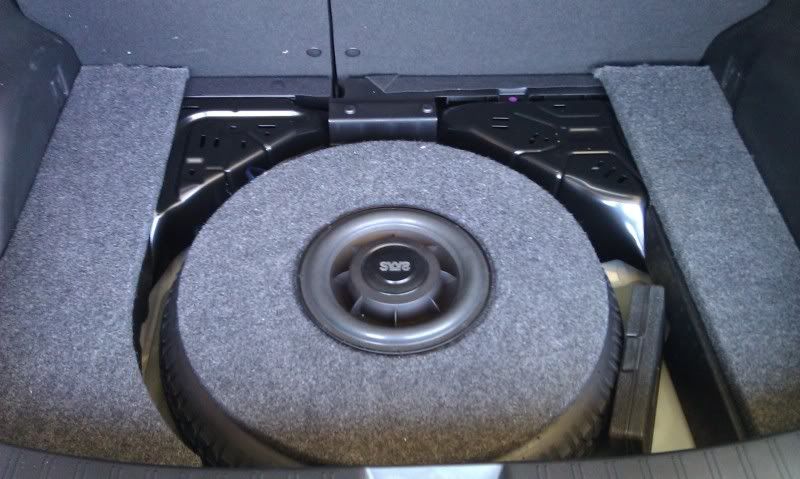
Taking my time, it took a couple of afternoons working slowly, but it is a solid component and all is working fine. Two channels run the front components and the rear is bridged to the custom subwoofer inside the spare tire.
I parked it under the front seat.

All wires are tucked away.
Signal cabling is a Monster Cable 4-channel XLN that is a little too long, but excess was minimal. It runs down the length of the center console and is tucked in under the carpet to run to the amp’s 4ch inputs. The remote turn-on lead follows the same path.
Power comes via 8 gauge Knu cable from the battery terminal, under the battery and then up to the fender (where it is fused), then behind the fender liner and into the driver’s side kick panel. From there, it goes down the stock cable channel and runs under the carpet to the amp.
I also have a picture comparison of the Metra harness to the stock speaker input, but they are the same. That is what makes them useful adapters.
Wiring the amp to the front speakers using the factory wiring:
Okay, I’ll make it a straightforward as possible…
One important note for n00bs: The larger the wire, the smaller the # associated with the “gauge” of the wire. 20ga is larger than 22ga; 4ga is larger than 8ga, etc.
So if you get the HU and the amp at the same time (and install them at the same time) and you want to re-use the OEM speaker wire to the doors, what you want to do is:
Wire up the harness that came with the HU to the 20-pin adapter harness, but DON’T wire the speakers from the HU into that harness.
From the HU, you will run an RCA cable and a small (18-22 gauge is fine) 12V “turn-on” wire (it will be blue) from the HU harness to the amp. I ran this through the center console to under the seat.
You will ground the amp and run a larger power wire (10gauge up to even 4 gauge) to the amp from the battery. See my thread for how/where I ran mine.
You will also run some aftermarket speaker wire (16 gauge is enough) from the amp to behind the headunit. You will connect these wires to the wires in the 20-pin harness that go to the speakers.
The “extra” wires on the 20-pin harness are associated with the BT steering wheel controls. follow svxDC’s directions on what to do with those.
3 thoughts on “Audio System”
Comments are closed.